Setting Up Your Roland Printer on Your Network
When your printer was installed, the Roland tech configured your printer to your network (excepting USB devices.) Hopefully you were shown where this is done on your printer, but there can be more to it than that. In this post I will be outlining the whole process. You may need to do this yourself when the network/router changes.
First – Identify your network settings: In order to input the settings on your printer you will need to know what settings they should be. I will assume a network where all computers and printers are connected via CAT5 cables to a router or switch. [If you have a direct connection from your computer to your printer – this will work, but your numbers will be very different AND your might need to set a static IP on your computer.]
There are three network settings that need to be entered: IP Address (internet protocol address), Subnet Mask, and Gateway. Without giving a history and concept behind of what these settings do suffice to say that they need to be all the same numbers with one exception. The exception is the last 3 digits of the IP adress. That needs to be unique for every “call” or item on your network – this includes your computer(s) and your Roland printer(s):
IP Adress: 192.168.1.x
Subnet Mask: 255.255.255.0
Gateway: 192.168.1.1
The above list of numbers is for a common router setup in many businesses. Yours may be of the 10.1.10.x variety and in big institutions/networks other numbers can be quite different. The idea does not change – only that “x” field gets set different on your printer.
Finding the IP settings on your network: We will use the CMD application in Windows to find your network setting. First boot up the CMD app by searching CMD in your start menu search field. When the CMD app launches – type IPCONFIG into the command line and hit [ENTER]. You should see a scroll of information. You will need to search out the Ethernet Settings for IPV4 that look like the settings above. Be careful that you are not finding the Wireless setting as that should/might be quite different.
[NOTE: CMD screen capture is a demonstration corrected to show the fields.]

The numbers shown in the IPCONFIG show the settings for the current computer. You will need to choose a number that is NOT this number. It also must not be the number(s) for anything else on your network.
The example shows: 192.168.1.35 – where 35 designates the unique IP address for your computer. Choose a number a bit away from that: 192.168.1.135. All of the other numbers MUST be identically inputed into the printer.
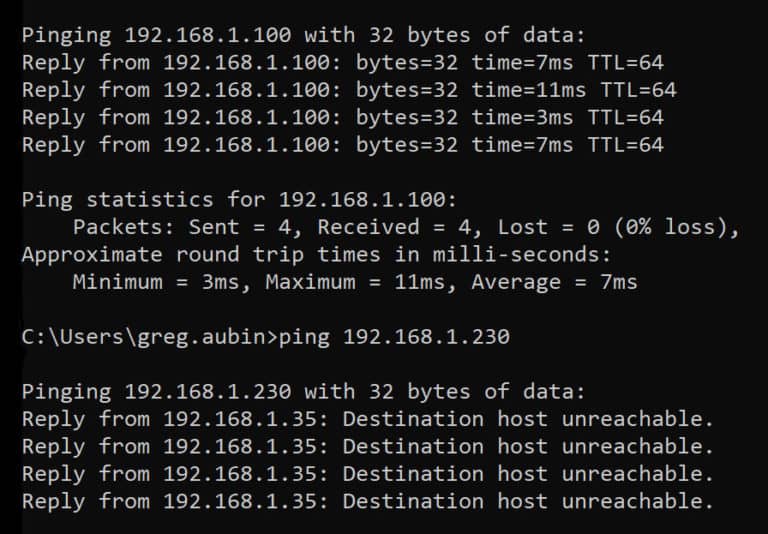
How do we know that the address we will input into the computer is unique? The answer is we will “ping” that new address (in this example 192.168.1.135) and see if any machine answers. In the CMD app type PING 192.168.1.135 [ENTER]. This routine sends out a request to the address and sees if it gets a response – like the ping we hear in submarines when they ping the sonar (no sound here, though.) Your number will most likely be different…but follow in kind.
If the PING responds with “Destination host unreachable.” – that number is a go. If there is equipment using that address number than you will get a response time – 7ms etc. Choose another number and try again until you get “Destination host unreachable.”
Inputing these correct numbers: Now that you have the numbers (and the correct last digits that don’t conflict) you need to enter them into your printer. On the printer – the place to enter the settings is [MENU]-[SYSTEM INFO]-[NETWORK]. You will see an entry for IP, SUBNET, GATEWAY – enter all the correct numbers and make sure you hit [ENTER] so that they are inputed correctly. Back out of the menu to the main screen in order for the setting to take effect.
Your printer is set up. Now go to VersaWorks and add your printer in the Printer-Printer Settings menu at the top. If the printer is already installed – highlight the printer – enter in the new IP address and click the Verify button. The software should respond with the printer and the serial number as before. If it errors out – redo the steps above and verify that all the numbers are proper.
I hope this helps.
Note to SP-540v users: You will need the InterCon-NetTool application to enter the IP into the printer and possibly a cross cable if connecting directly.
Static IP on the Computer: If you are connecting directly from the computer to the printer – my suggestion is to set up the computer with a static IP Address like the one above – which would likely match an installed router in the future. Setting up a Static IP is done in the properties of the network device. If you don’t understand this – I suggest you find help from someone who does.