VersaWorks – Variable Data Tab
VersaWorks has a rarely used feature that could be very useful if understood. The Variable Data tab allows one design to be used to create many individual outputs. The simplest term is “Mail Merge.” This comes from the old process of writing one form letter and merging it with a list of names to create mailers personalized for each customer. With In VersaWorks the “Form Letter” can be name tags, awards, or just simply a sequential numbering for something like parking window stickers.
Variable Data Printing can be even more powerful. A designer can create a file that has a placeholder for names, ID numbers, photos, and company logos. Then a data file is made that identifies the placeholder’s individual variables (or identifiable names) and each data input for each “instance” of the design. The data file that has a line for each example (or mailed form letter in the above example) and prints it out.
Making the [FILE] and making the [DATA FILE] is quite simple once the process is understood. Dowload the two example files in the preceeding sentence and follow through this tutorial. This example will demonstrate how it works in VersaWorks. After you play with the sample, a simple explaination will follow.
After downloading the files, load the file [VDP_Label.pdf] into Queue A. It can be loaded into any queue, but for this example keep it specific. Once loaded, notice the “Special Items” area at the bottom of the Document Information area of the Preview Window. This file will show an icon of two rectagles looking like pages.
![]()
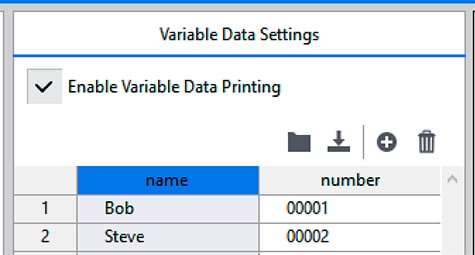
 Open the Settings window for this file – (double click OR right click-settings OR Menu-Job-Settings.) Once open go to the Variable Data tab – this will be the last tab on most printers; printers with White, Gloss, Primer or Metallic will have this tab second from the bottom. Once in the Variable Data tab, click the “Enable Variable Data Printing” check box. You will now see headers for the two loaded variable placeholders in the design file – name – number.
 Click on the Load From File icon and navigate to the [VDP_Label_Data.txt] file and select it – pull the dropdown for file type and select Tab Delimited – and click OK. You will now see the data entries for each name and number. Highlight the “name” column at the top. This action opens the typeface window which will allow editing of typestyle, size, color, alignment, etc. Play with these functions – most importantly change the color to white – black is hard to see on blue. Do the same for the number column.
Once you have adjusted to yout liking – click the Layout tab – first at the top – and see the results. You should see 6 seperate designs with different names and numbers on each file.
Now for how this was created: Open the PDF file in your design software to look at how this was prepared. Once open you will notice that two white stroked boxes have a spot color assigned to the box. The top one is named VDP_number; the bottom one is named VDP_name. The whole name of the spot color is case sensitive, uppercase and lower case matter. The leading name must be “VDP_” – that is an underscore after the VDP. The following text string is a rememborable name for the variable – name and number is pretty clear. Typically variable names are made all lowercase to avoid confusion.
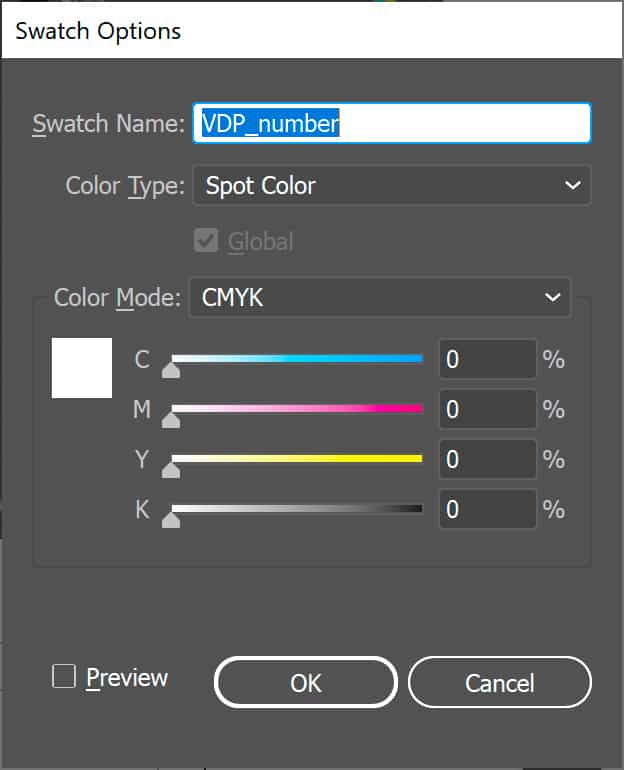 Assigning Spot Colors: Making these spot colors will be different in different design packages. Typically a new swatch is made (actual color/hue does not matter for the variable data printing function), but the color type must be set to spot color. Look for the dropdown that shows RGB or CMYK. There should be a Spot Color choice. The important step is the Spot Color Name: It must be assigned the VDP_ variable name like above. Save the file as a PDF or EPS file (Note: CorelDraw has a checkbox that converts spot colors to CMYK or RGB – make sure that check box is NOT checked.) Load the file into VersaWorks and see if the Special Items shows the icon – and open the settings and check the variable data box and see if it was done correctly.
Making the Data: The simplest way to make a data file is in Notepad. The first line needs to define the variables. Each variable should be seperated by a TAB character (the delimiter) and end with an [ENTER.] Be aware that spaces may cause problems so do not add any additional spaces. Each following line is a data record or will define each label or sign. It will mimic the first line is structure – data TAB data… [ENTER]. Check for the sample data file to see this structure. Note: Notepad does not easily show the spaces clearly – so visual structure may be clumsy. Excel user can make a spreadsheet and export in one of the supported files.
Some known issues: Transparencies under the variable data spot color may cause problems. Slanted boxes will not slant the text – the bounding box simply identifies where text is placed. Images either need a path from root (c:\…) in their name – or the files need to be in the same folder as the data file. As with many advanced function in VersaWorks – keep it simple and start by making a simple example for practice.
[REURN TO VERSAWORKS – START HERE ]