Adding a Cutline in Illustrator
One of the first thing most new Roland print/cut device users must learn is how to add cut lines to thier artwork. Adding the CutContour swatch to the stroke of the shape you want cut is a basic process. Creating the shape can be much more complicated. In this post I will go through my approach. I will assume that the designer is starting with a vector artwork file and I’ve included the file [HERE].
It must be stated that the CutContour is applied using Illustrator, (it could be done in InDesign as well), but cannot be added in Photoshop. So if you are a Photoshop designer you will need to import the Photoshop artwork into Illustrator. This can be addressed in a future post dealing with the “Pen Tool.”
I suggest users first read through my post on installing the swatches in Illustrator – [HERE].
  |
If you haven’t grabbed the file click on the colored artwork above to download the PDF of the artwork. We will be working with this files in order to demonstrate the approach I use. The black and white image is the same artwork shown in “Preview” mode. Once you load the demo file into Iluustrator – you can see the Preview by using the VIEW-PREVIEW command. I always use control-Y to toggle these views. Give that a try.
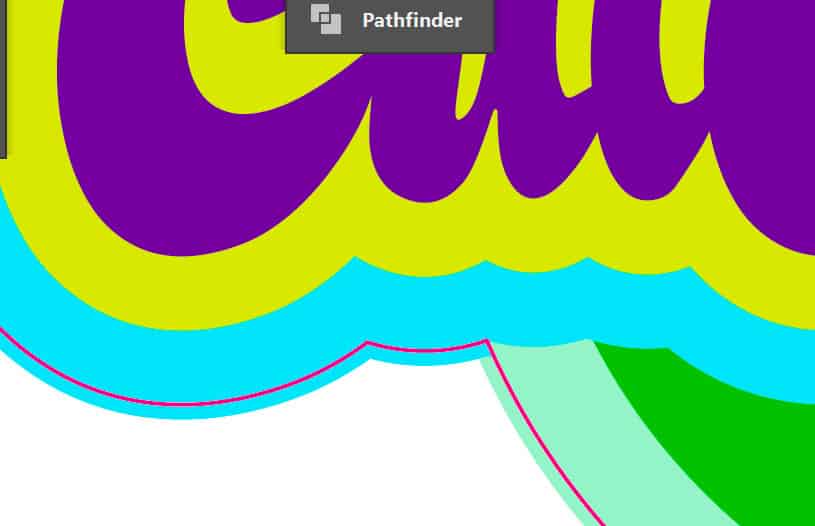
Notice the PREVIEW mode shows the vectors used to crete the file. What I will be doing is using these vectors to create a new vector that will cut the outside contours.
First thing we need to do is open the Layers floating pallette – WINDOW-LAYERS. Once open – you will notice the file has one layer [Layer 1].
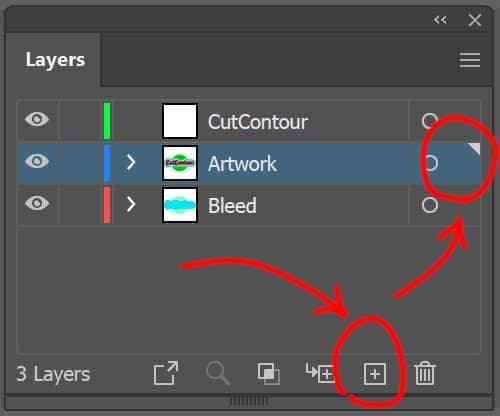 At the bottom of the Layer Pallette is a “+” box that is the “Create New Layer” button. Click on this button to create a new layer – [Layer 2]. Repeat this one more time – [Layer 3]. Double clicking on the layer name will allow you to rename the layers. Rename [Layer 1], the artworks layer, to [Artwork]. Rename [Layer 2] to [Bleed]. Rename [Layer 3] to [CutContour]. The last action I want to take is dragging the [Bleed] to the bottom of the list – this is done by click-dragging the layer. Give this all a go and if you succeed. The file will now look like this [HERE]
 Now we need to create a Bleed and a CutContour. The bleed will place colors of the image on either side of the CutContour allowing our cutting fuction to be a little off without showing white kisslines when the decal is installed. I make the bleed first because when we copy the vectors they will have the fill colors. Once we make the CutContour we will no longer have those colors.
Using the Selector Tool (the hollow arrow at the top left of the toolbox) select the outside circle and the outside letter cloud/bubble. In order to select both – click on the first object and then hold the shift key to add the second object.
Once both are selected – look at the layers pallette. There will be a colored square (really tiny) on the rightmost part of the [Artwork] layer. That square represets the current selection. If you click-drag that square to the Bleed layer you wall have moveed the selection to the Bleed layer. BUT, if you hold the ALT key while doing the click-drag it will leave the original selection on is the Artwork layer and place a new selection (or objects) on the Bleed layer. We just copied the selection to the Bleed layer.
Now click on the eyeball next to the [Artwork] layer. This will hide that layer. Select each object on the [Bleed Layer] one at a time and click the swap arrow shown at the right. This will “Swap fill and stroke” command – Shift-X. Select both of them one at a time and change the Stroke thickness to 4 pt – using the Stroke Pallette. Make sure the Align Stroke is set to Align Stroke to Center – leftmost selection. You have just created a bleed.
Now select these two objects and copy them to the [CutContour] layer like you just did – click-drag the selection box in the [Bleed] layer to the [CutContour] layer while holding the ALT key. (release click before releasing ALT.)
 The last step is making the two shapes one, applying the CutContour swatch to the outline, and making the stroke 0.5 pt width.
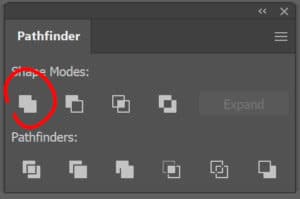
To make the two shapes one – open the Pathfinder Pallette. Click the eyebal on the [Bleed] layer to hide it. Select both shapes using the Select-All or just window or shift select. Once selected press the Unite button in the Pathfinder Pallette – it is the shape on the top row left. Make sure the stroke selection in in front of the fill over on the Toolbox and click the CutContour swatch (that you loaded and opened from learning the previous post.)
Now click on all the layer eyeballs and look at your result. Your file should look like this [HERE].
I hope this was clear and helped step you through the process. Keep in mind that layers that are hidden will behave as if they are not in the file (whic is good when you want just the artwork.) This is why I adopted this method – using layers that can be hidden.